While playing around with Borders in JavaFX, I came across the term “9-patch scaling technique”, and I wondered what that actually means.#
First of all, “9-patch” means that a rectangular area is divided into 9 areas (patches) of possibly different sizes as shown in the following image:
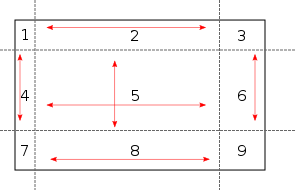
Each area has either a fixed size (the corner areas 1, 3, 7, 9), or it can be resized vertically (4,6) or horizontally only (2,8), or it can be resized both vertially and horizontally (the central area, 5).
When using “9-patch scaling”, each area gets a particular fill color, pattern or even image assigned. If a pattern or image is used, it is either stretched or tiled (repeated) in those areas which are resizable, so that the pattern or image fills the whole area.
Normally, the central area contains some particular content, and the outer areas are used to define a border around that content. In JavaFX, the rectangular area itself is a Region or one of its sub classes, and its Border can be set with the Region.setBorder(Border value) method.
Border is essentially a list of strokes and images which are drawn one above the other, in the order they are stored in the list. There are some special conditions to consider especially when using both Strokes and Images with the same Border. The remaining article will focus on using images, hence I will not go into the details of these constraints. See https://docs.oracle.com/javase/8/javafx/api/javafx/scene/layout/Border.html for more information.
Image based borders can be created either in code through the BorderImage class, or they can be defined in CSS. The following diagram shows the BorderImage parameters, their corresponding style sheet property and how the given values are used to specify the border:
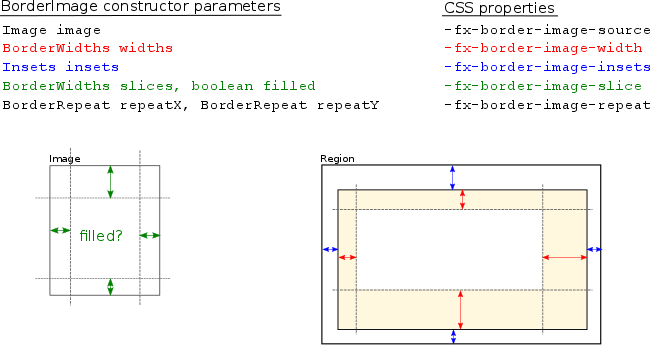
The image itself is defined through the Image parameter or through the -fx-border-image-source CSS property. The slices parameter or the -fx-border-image-slice property defines the slices on the source image. The filled parameter specified whether the central slice should also be used when rendering the border – in CSS, this is part of the -fx-border-image-slice property by adding a value of fill.
The remaining parameters define how the border is constructed – the widths parameter or the -fx-border-image-width CSS property (shown in red above) defines the width for each of the four border edges. Note that its also possible to specify one value only (the BorderWidths constructor has a single argument variant) – in that case the value applies to all four edges. The insets parameter or the -fx-border-image-insets property (shown in blue above) defines the distance from the Region’s bounding box to the border. Finally, the repeatX/repeatY parameters or the -fx-border-image-repeat property defines how the slices in the border are filled if the corresponding image slice is too small – essentially, the image can be repeated (tiled) or scaled (stretched).
As an example, lets assume that we have a simple Button which we would like to surround with a border:

The button is created in Java code like this:
Region r = new Button("Hello World");
r.setId("hello");
To add the border, we need to create an image (lets call it border.png) similar to the following one:

How exactly the image looks like and how large it is is of secondary interest – we could even discard the central white rectangle, since we define the area to use from that image through the slice property. It is just important that the image can be divided into nine areas when applying the sizes given in the slice parameter:
#hello {
  -fx-border-image-source: url(border.png);
  -fx-border-image-slice:  6px;
  -fx-border-image-insets: 0px;
  -fx-border-image-repeat: repeat;
  -fx-border-image-width:  6px;
}
Some more advanced examples are shown at https://www.w3.org/TR/css3-background/#border-images. As the next step, we might want to try to add an additional image like a status indicator to the border. Lets assume that we have the following image trafficlight.png which we would like to add to the upper right corner:

In theory, this is possible since we can define a list of images and/or strokes when specifying the border. In CSS, this is done by specifying the parameters for each image separated by commas:
#hello {
  -fx-border-image-source: url(border4.png), url(trafficlight.png);
  -fx-border-image-slice:  6px             , 16px 46px 0px 0px;
  -fx-border-image-insets: 0px             , 0px;
  -fx-border-image-repeat: repeat          , no-repeat;
  -fx-border-image-width:  6px             , 16px 46px 0px 0px;
}
In order to see the whole image unscaled, we set the top and right slice to the image’s size, and we also specify the corresponding border widths with the same size. This results in the following image:

As you see, the right border now has the width of 46 pixels as specified – depending on the use case, this might work well but probably the expectation was to achieve something like this:

We could try to put the traffic light into the top slice instead of the top right slice, but as said above the slices are always fillled, either by stretching or by repeating the corresponding image slice (the CSS value no-repeat is actually “stretch”):
#hello {
 -fx-border-image-source: url(border4.png), url(trafficlight.png);
 -fx-border-image-slice:  6px             , 16px 0px 0px 0px;
 -fx-border-image-insets: 0px             , 0px;
 -fx-border-image-repeat: repeat          , no-repeat;
 -fx-border-image-width:  6px             , 16px 0px 0px 0px;
}

Again, depending on the use case, this might be usable, and if it is assured that the central area always has the same width (which often is not the case) one could use a larger source image which fills the whole border in order to avoid scaling/stretching. However, a better solution in this case is to use a layout component like BorderPane and not use borders for such use cases.
A complete sample application which demonstrates the results shown above is available at https://github.com/afester/JavaFXsamples/tree/master/src/afester/javafx/examples/border. Simply clone the https://github.com/afester/JavaFXsamples repository, import the eclipse project into Eclipse and launch the afester.javafx.examples.border.BorderExample class.