Month: April 2014

Oracle ADF: Application Menu meta data wiring

Using the af:navigationPane and af:commandNavigationItem components, it is possible to create menus on a JSF page based on meta data. Setting up the necessary files and declarations for the menu meta data is quite simple: in JDeveloper, select a .jspx file in the project navigator and choose “Create Applications Menu” from the context menu. JDeveloper will take care of creating the necessary meta data entries. See Creating ADF Menus for Page Navigation for more information.

If something goes wrong, it is good to know how the data is wired in the background. The following diagram shows the structure of the meta data which is involved in application menu creation, and how the various parts are looked up once a browser request for a given view arrives:
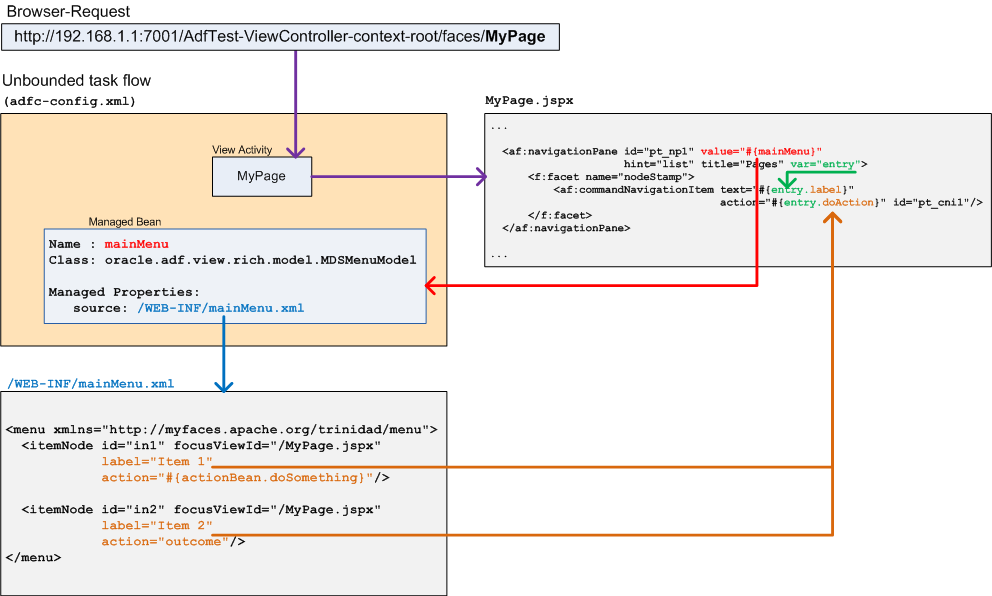
  • Once the browser request for a view comes in, ADF loads the corresponding .jspx page to create the JSF component tree.
  • At the location where the menu shall be rendered, the .jspx file contains an af:navigationPane component with an embedded af:commandNavigationItem component.
  • af:navigationPane references a managed bean through its value attribute. This bean is implementing the model for the menu.
  • The managed bean has a property named source which contains the name of the menu meta data file to use.
  • For each itemNode in the menu meta data file, ADF creates an af:commandNavigationItem with the corresponding text and action attributes.
Oracle ADF: Required grants when implementing the UIShell

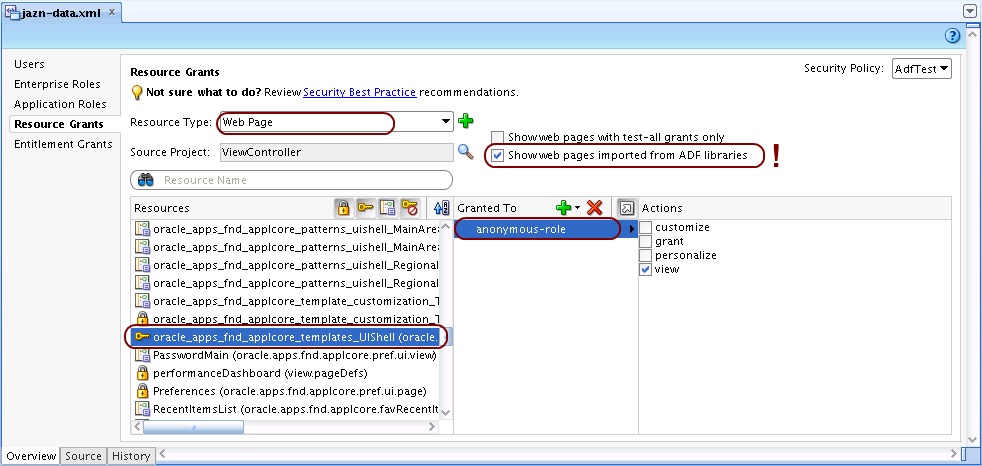
When implementing the Oracle ADF UIShell, it is crucial to set the necessary grants for the UIShell template and the UIShell task flows imported from the ADF libraries. If these grants are not correctly assigned, the dynamic areas of the UIShell remain empty. If unsure, you can check if the dynamic areas are generally working at all by temporarily disabling ADF security. If they do, but then are again empty after re-enabling security, the grants are not properly set up. To assign the necessary grants, open jazn-data.xml through JDeveloper’s “Application/Secure/Resource Grants” menu and select “Resource Type: Web Page”. Make sure to check “Show web pages imported from ADF libraries” – otherwise, only the pages from the project are shown, but not those which reside within ADF libraries. Assign the anonymous-role to oracle_apps_fnd_applcore_templates_UIShell:

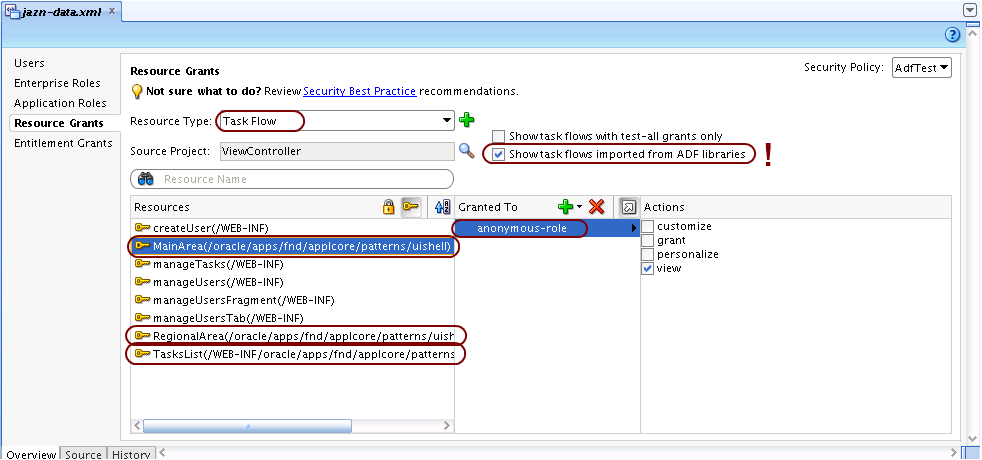
Then, select “Resource Type: Task Flow”, and again make sure that “Show task flows imported from ADF libraries” is checked. Assign the anonymous-role to the MainArea, RegionalArea and TasksList task flows as follows:

Oracle JDeveloper: how to define the default run target

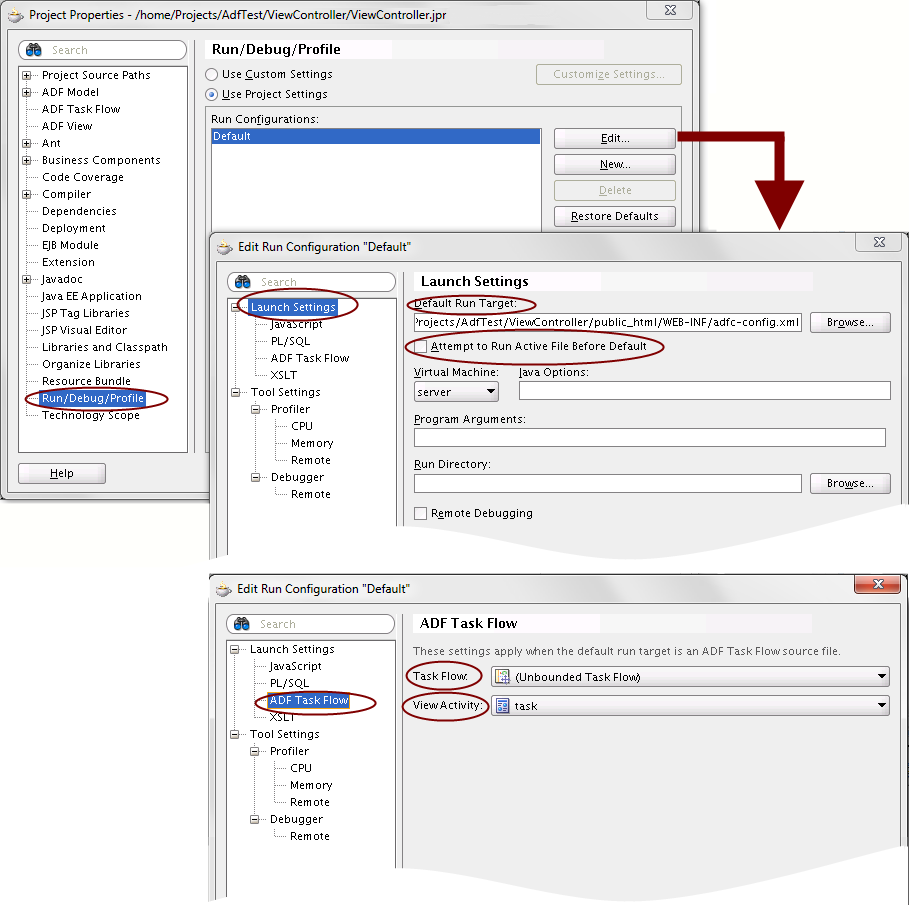
In JDeveloper, an application can be deployed to the internal weblogic server by selecting an entry in the project navigator and choosing “Run” from the context menu. JDeveloper then also prints the target URL through which the application can be accessed to its console. Which file is actually used as the application’s starting point and how the target URL is constructed can be defined in the “Run configuration” of the project (usually the ViewController project). Select the ViewController project, and then from the context menu choose “Project Properties”. In the “Project Properties” dialog, select the “Run/Debug/Profile” section from the tree on the left, and then edit the run configuration. The “Edit Run Configuration” dialog is shown (click to enlarge):

In the “Edit Run Configuration” dialog, there are two sections which define the default run target:
  • “Launch Settings” defines the file to use as the run target. This can for example be an ADF task flow file such as adfc-config.xml for the unbounded task flow or a particular .jspx file. Below is the option “Attempt to Run Active File before Default”: this influences whether JDeveloper shall always use the file provided above, or, when a particular file is currently selected in the project navigator, JDeveloper shall first try to use that file as the run target.
  • In case the default run target is an ADF task flow, there is a second section in the “Edit Run Configurations” dialog which needs to be considered: “Launch Settings => ADF Task flow”. There, the actual task flow to execute by default is defined.

Resolving build dependencies through manifest file

The MANIFEST.MF file in a jar file can be used to define runtime dependencies through the Class-Path attribute. In the manifest specification, it says:

Class-Path: The value of this attribute specifies the relative URLs
of the extensions or libraries that this application or extension needs. 
URLs are separated by one or more spaces. 
The application or extension class loader uses the value of this attribute
to construct its internal search path.

Since it explicitly states “application or extension class loader”, it is not completely clear from the specification that the Class-Path attribute is also considered by the javac compiler to resolve build dependencies. However, it is – this is the bug which introduced that feature in Java 5: https://bugs.java.com/bugdatabase/view_bug.do?bug_id=4212732 Consider the following sample code which imports classes from some third party jar files:

package com.example;

import org.apache.log4j.PropertyConfigurator;
import com.google.gson.Gson;

public class Sample {

   public static void main(String[] args) {
      PropertyConfigurator.configure("log4j.properties");
      Gson gson = new Gson();

      // ...
   }
}

We can create a jar file like libs.jar with a Class-Path reference to the corresponding libraries:

$ cat manifest.txt
Class-Path: lib/gson-2.2.2.jar lib/log4j-1.2.17.jar

$ jar cvfm libs.jar manifest.txt
added manifest

By simply adding the libs.jar to the classpath when invoking javac, the additional jar files get pulled in:

$ javac -d bin -classpath libs.jar -sourcepath src src/com/example/Sample.java

$ ls -la bin/com/example/Sample.class
-rw-r--r-- 1 andreas users 432 Apr  7 12:20 bin/com/example/Sample.class

A real-world sample where this is used is the Oracle Platform Security Services. There is only one jar file which needs to be added to the build path, jps-manifest.jar, which references all other required jar files through its Class-Path attribute.