Suppose you have an Image and want to extract the color channels for red, green and blue into three new images. A straight forward way would be to create a new empty image with the same size as the source image, iterate the source image pixel by pixel, convert the pixel color of each pixel and set the converted color for each pixel in the destination image. In JavaFX, this is possible through the PixelReader and PixelWriter interfaces:
public Image getBlueChannel(Image sourceImage) {
    PixelReader pr = sourceImage.getPixelReader();
    int width = (int) sourceImage.getWidth();
    int height = (int) sourceImage.getHeight();

    WritableImage result = new WritableImage(width, height);
    PixelWriter pw = result.getPixelWriter();
    for (int x = 0;  x < width;  x++) {
        for (int y = 0; y < height;  y++) {
            Color col = pr.getColor(x, y);
            pw.setColor(x, y, new Color(0, 0, col.getBlue(), 1.0));
        }
    }

    return result;
}
This example creates a new WritableImage with the same size as the source image, and then iterates the source image pixel by pixel and sets the corresponding pixel in the writable image, using the blue component of the source pixel only.
While this works well (and shows how to access individual pixels of an Image, which can be useful in various situations) it is definitely not a good approach, especially due to performance reasons. It might work well enough for a smaller image (like 200×100 pixels) but for larger images it will most likely get too slow.
A much better way is to use the JavaFX Blend effect which takes two input sources and combines them into an output. The two input sources are called topSource and bottomSource, and they can be combined by a couple of operations which define how each individual pixel of the two input sources are combined to create the result pixel. When the effect is applied to a node in a scene graph, the node itself is taken as top source and/or bottom source if either of them has not been set explicitly. Thus, if the top source is explicitly set for the Blend effect and then the effect is applied to a node, the result is the topSource combined with the node itself. The following example creates a ColorInput where all pixels are set to blue (rgb(0, 0, 255)) as the top source, and an ImageView node is used as the bottom source. The two sources are combined by multiplying the color values of each pixel to generate the resulting pixel:
public Image getBlueChannel(Image sourceImage) {
    ColorInput colorInput = new ColorInput();
    colorInput.setPaint(Color.Blue);
    colorInput.setX(0);
    colorInput.setY(0);
    colorInput.setWidth(sourceImage.getWidth());
    colorInput.setHeight(sourceImage.getHeight());

    Blend blend = new Blend();
    blend.setMode(BlendMode.MULTIPLY);
    blend.setTopInput(mask);

    Node img = new ImageView(sourceImage);
    img.setEffect(blend);

    SnapshotParameters params = new SnapshotParameters();
    Image result = img.snapshot(params, null);

    return result;
}
Why does the example use the MULTIPLY operation for each pixel? In the earlier days, a 24 bit RGB pixel was made up of three eight-bit-values, one for each color channel:
   Red         Green        Blue
xxxx xxxx    xxxx xxxx    xxxx xxxx
So, to get one of the color components only (say, blue) it sufficient to create a bit mask where only the bits from the blue channel were set to 1. By AND-combining the color with the mask, the blue channel was then extracted:
       Red         Green        Blue
    xxxx xxxx    xxxx xxxx    xxxx xxxx
AND 0000 0000    0000 0000    1111 1111
----------------------------------------
  = 0000 0000    0000 0000    xxxx xxxx
In JavaFX, the color channel values are floting point values between 0.0 and 1.0. In order to keep the values for one color channel and set the values for all other color channels to 0.0, we can multiply the color with (0.0, 0.0, 1.0):
    Red   Green  Blue
    n.n    n.n    n.n
X   0.0    0.0    1.0
----------------------
=   0.0    0.0    n.n
https://github.com/afester/JavaFXsamples/tree/master/src/afester/javafx/examples/colorchannels contains a complete example in the ColorChannelsExample.java file, which extracts the red, green and blue color channels from an image:
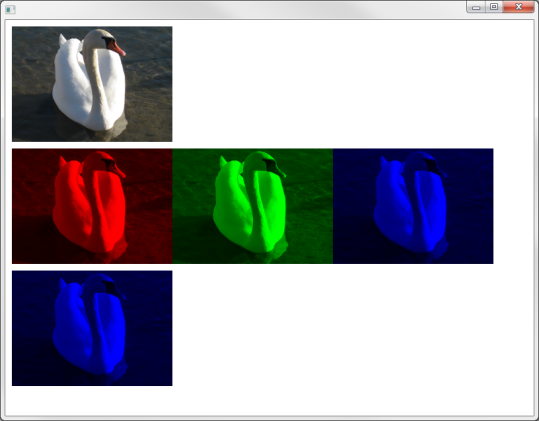
The lower blue image uses the initial example where each individual pixel is processed through a PixelReader and PixelWriter.
Alternative approach
If we only want to display the color channel of the image, and if there is no need to further process the images which contain a specific color channel, we do not need to generate real Image instances for each color. We can simply use different ImageView nodes which all use the same source image, and apply the Blend effect for red, green and blue to the ImageView nodes:
    ...
    // Create Blend effect for red channel
    ColorInput colorInput = new ColorInput();
    colorInput.setPaint(Color.RED);
    colorInput.setX(0);
    colorInput.setY(0);
    colorInput.setWidth(sampleImage.getWidth());
    colorInput.setHeight(sampleImage.getHeight());
    Blend redBlend = new Blend();
    blend.setMode(BlendMode.MULTIPLY);
    blend.setTopInput(mask);

    // Create Blend effect for green channel
    Blend greenBlend = ...

    // Create Blend effect for blue channel
    Blend blueBlend = ...

    ImageView sourceView = new ImageView(sampleImage);

    ImageView redView =   new ImageView(sampleImage);
    redView.setEffect(redBlend);

    ImageView greenView =   new ImageView(sampleImage);
    greenView.setEffect(greenBlend);

    ImageView blueView =   new ImageView(sampleImage);
    blueView.setEffect(blueBlend);
    ...
The result is the same as above, but we did not have to create all the Image instances:
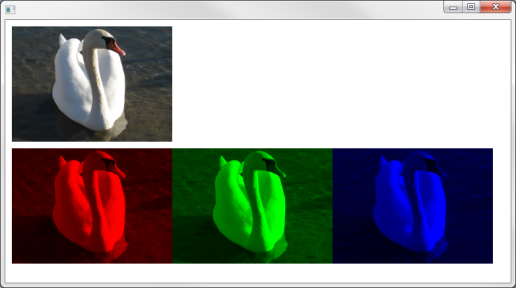
The complete example is available at https://github.com/afester/JavaFXsamples/tree/master/src/afester/javafx/examples/colorchannels in the ColorChannelsExample2.java file.