Currently the latest WebLogic release which is supported by the Eclipse WTP out of the box is 10.1.3.x. However, Oracle provides the Oracle Enterprise Pack for Eclipse (OEPE) to support WebLogic up to 12.1.2.3.
Installing the Eclipse OEPE plugin
The Oracle Enterprise Pack for Eclipse can be installed as usual through “Help => Install New Software”. The update URLs are:
- For Eclipse Indigo: https://download.oracle.com/otn_software/oepe/indigo
- For Eclipse Juno: https://download.oracle.com/otn_software/oepe/juno
- For Eclipse Kepler: https://download.oracle.com/otn_software/oepe/kepler
Note that these URLs only work from within Eclipse – when accessing them through a browser, the server responds with a 404 error. See also the Oracle Enterprise Pack for Eclipse home page for more information.
Add the update site and install the whole “Oracle Enterprise Pack for Eclipse” plugin:
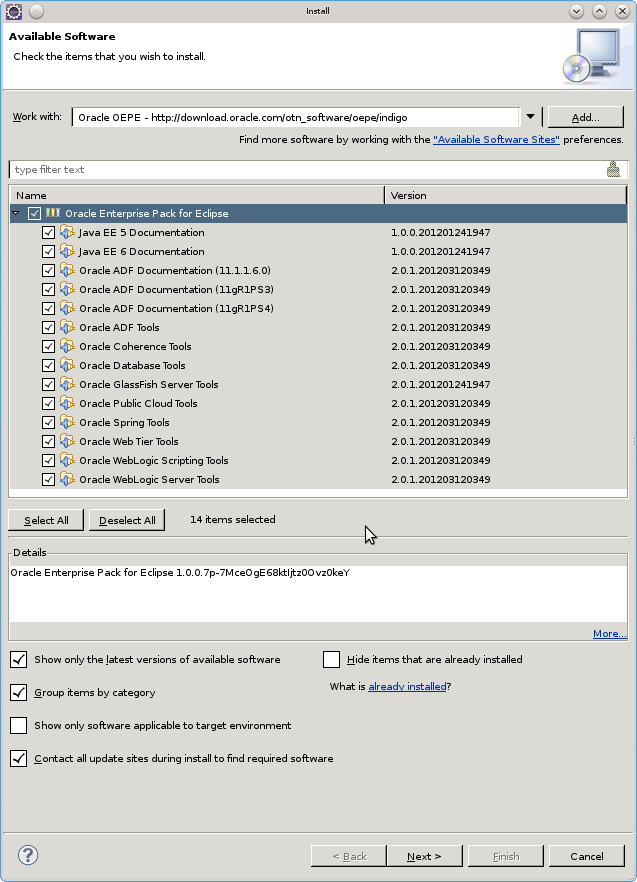
Note: I had to deselect the “Oracle WebLogic Scripting Tools” due to a conflict with PyDev. Since I do not need the WLST for now, this was the easier solution than de-installing PyDev.
Press “Next >”, review the items to be installed and press “Next >” again, accept the license agreement and press “Finish” to start the installation.
Installing WebLogic server
After the plugin has been installed, download the WebLogic 12c package from https://www.oracle.com/technetwork/middleware/ias/downloads/wls-main-097127.html. There are several packages available, since we have already installed the OEPE we can use the Generic Installer. This will download the file wls_121200.jar. Start the installer with
$ java -jar wls_121200.jar
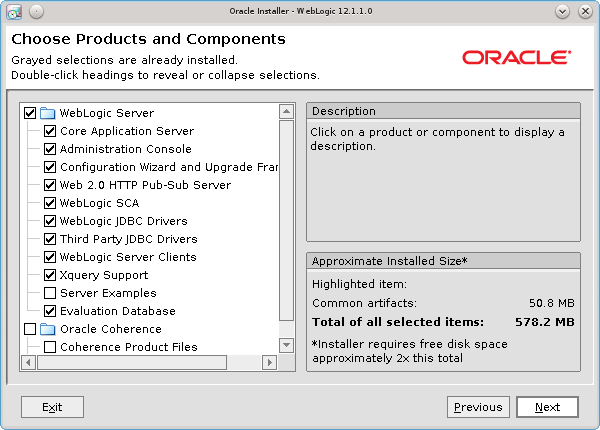
When asked for the Middleware home, choose “Create new Middleware home” and select the installation path. You can skip the section where the installer asks whether you want to receive security information, since this installation is for development/testing only. Choose the “Custom” install type and in the next screen, deselect “Oracle Coherence” – we do not need this for now. The screen should look like this now:
Press “Next >” and choose the JDK to use for the Weblogic server. Press “Next >” again and define the product installation directories – you can take the default value here. Press “Next >”. Verify the Installation summary and press “Next >” to start the installation.
Setting up the WebLogic runtime in Eclipse
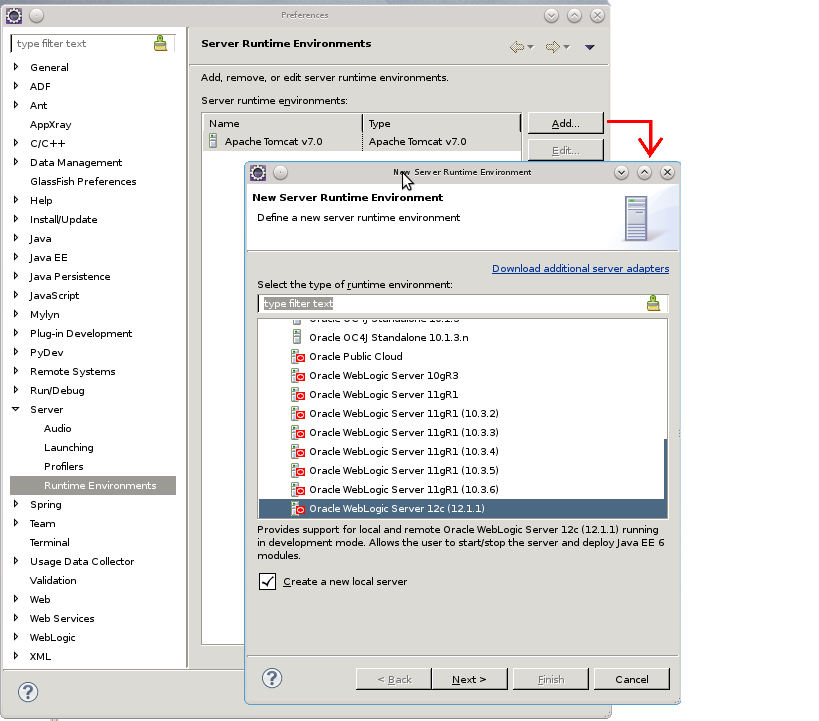
We can now setup the WebLogic Server in Eclipse, similar to what we did in the previous chapter for Tomcat. Open “Window => Preferences” and select the “Server => Runtime Environments” node. Press the “Add…” button to add the new server runtime:
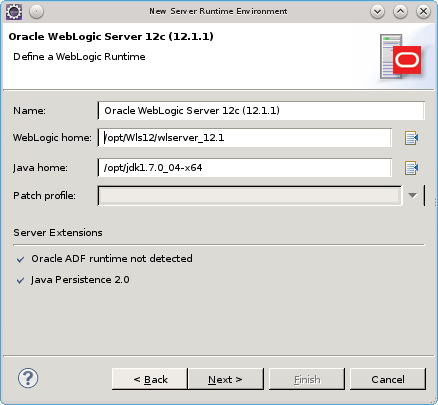
Press “Next >” to define the WebLogic home and the Java home in the next screen.
Note: For WebLogic home, do not use the Middleware home, but the server home (the wlsserver_12.1 directory below the Middleware home directory)!
Note 2: After I have entered the directories for WebLogic home and Java Home, I had to go “Back” and press “Next >” again to have the plugin check the actual WebLogic home and enable the “Next >” button.
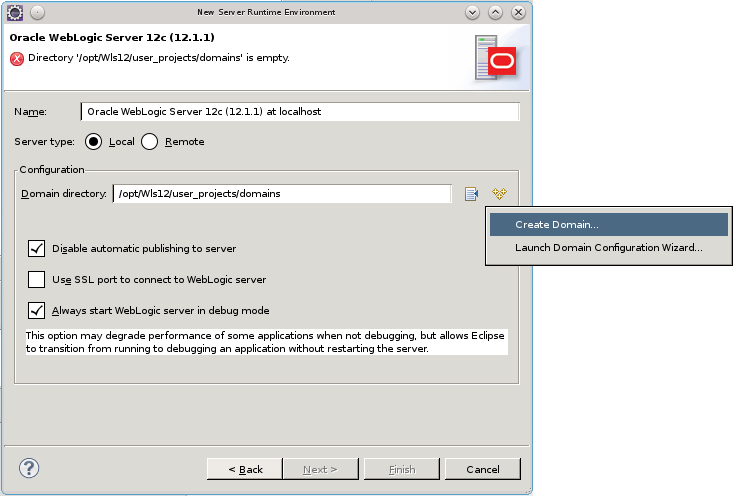
The resulting dialog looks like this:
Press “Next >”. In the next dialog, we need to configure a WebLogic domain. A WebLogic domain is a kind of runtime container or runtime context for J2EE applications. Enter a directory name for the Domain directory, and check “Always start WebLogic server in debug mode”. This allows easier debugging and code changes without having to restart the server.
Then, press the icon with the three “+” signs and from the context menu, select “Create domain …”:
In the next dialog, enter a name for the new Domain and keep the defaults for all other settings:
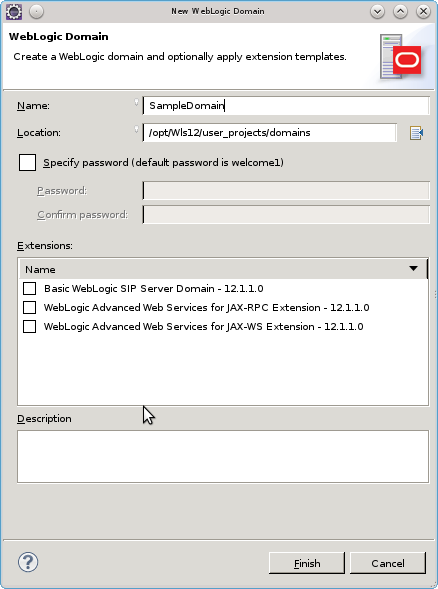
When the WebLogic domain has been created, the previous dialog appears – press “Finish”. Finally press “Close” to close the Preferences dialog.
Verifying the WebLogic installation
After the installation has been succeeded, verify if the WebLogic server can be started and stopped properly. This should be done from the command line first. Navigate to the bin directory in the domain directory and launch the startWebLogic.sh script:
$ cd /opt/Wls12/user_projects/domains/SampleDomain/bin
$ ./startWebLogic.sh
Open a browser and navigate to https://www.labcorner.de:7001/console to launch the WebLogic console.
Note: In case the deployment of the console fails due to an OutOfMemory exception, it might be necessary to hard stop (kill -9) the weblogic server and set the USER_MEM_ARGS environment variable to allocate more memory to the JVM. Add the following statement to the top of the /opt/Wls12/user_projects/domains/SampleDomain/bin/setDomainEnv.sh script and then start the server again:
export USER_MEM_ARGS="-Xms512m -Xmx1024m -XX:MaxPermSize=512m"
Once it has been verified that the WebLogic console is available, stop the WebLogic server from a second shell:
$ cd /opt/Wls12/user_projects/domains/SampleDomain/bin
$ ./stopWebLogic.sh
Note: In case stopWebLogic.sh can not connect to the server, explicitly specify the URL with www.labcorner.de instead of the hostname – it might be that WebLogic is only listening on the loopback device and can therefore not be accessed through the official IP address:
$ cd /opt/Wls12/user_projects/domains/SampleDomain/bin
$ ./stopWebLogic.sh weblogic welcome1 t3://www.labcorner.de:7001