Including untracked files in new directories in git status output

git status shows the status of the workspace – like which files have been modified or which files are new. For new directories with new files in them, the default behavior is to only show the directory name – but not the contents of the directory:

$ mkdir -p newDir/subDir
$ touch newDir/newFile1 newDir/newFile2 newDir/subDir/newFile3
$ git status
# On branch master
#
# Initial commit
#
# Untracked files:
#   (use "git add <file>..." to include in what will be committed)
#
#       newDir/
nothing added to commit but untracked files present (use "git add" to track)

I usually prefer to also see the contents of the directories – this can be achieved by adding the parameter --untracked-files=all to git status:

$ git status --untracked-files=all
# On branch master
#
# Initial commit
#
# Untracked files:
#   (use "git add <file>..." to include in what will be committed)
#
#       newDir/newFile1
#       newDir/newFile2
#       newDir/subDir/newFile3
nothing added to commit but untracked files present (use "git add" to track)

It is a littlebit cumbersome to type this parameter each time, but Git allows to define aliases for commands. Straightforward, we can try to add the following alias to ~/.gitconfig:

[alias]
        status = status --untracked-files=all

Unfortunately, this will not work – Git does not allow to redefine existing commands (see “alias.*” at https://git-scm.com/docs/git-config). Some commands allow to add default parameters in ~/.gitconfig, in a format similar to

[status]
        untracked-files=all

but again, for status, this does not work. The simplest way is to just define a new command alias, like

[alias]
        statusall = status --untracked-files=all

This will not change the default behaviour of the status command (which is probably good, since scripts might rely on the default output format of the command), but it simplifies the above command line:

$ git statusall
# On branch master
#
# Initial commit
#
# Untracked files:
#   (use "git add <file>..." to include in what will be committed)
#
#       newDir/newFile1
#       newDir/newFile2
#       newDir/subDir/newFile3
nothing added to commit but untracked files present (use "git add" to track)

Using capture groups in regular expressions

Using regular expressions, it is easy to extract parts which match a particular pattern from a string. Suppose the input string contains some text, followed by a number, possibly followed by some garbage which is of no further interest:

"Hello World12345Garbage"

To extract the leading text part (“Hello World”) and the number (“12345”), the following regular expression can be used:

(\D*)(\d*)

\D is a special sequence inside a regular expression which matches any non-numeric characters. \d is the opposite and matches any numeric character. The * specifies that we want to match any number of the preceeding character, so \D* matches any number (including none) of non-digits, while \d* matches any number of digits. Finally, the parentheses define so-called capture groups. They group the various parts of the pattern so that these groups can later be accessed. Since we want to match text (non-digits) followed by a number (digits), the capture groups are (\D*) for the text part and (\d*) for the numeric part. See https://docs.oracle.com/javase/8/docs/api/java/util/regex/Pattern.html for a complete list of the supported regular expression syntax. The following code shows a complete example, using the Pattern and the Matcher classes. Note that we need to escape the backslash with another backslash in the regular expression string, so that the java compiler actually inserts a backslash character, and does not treat it as an escape sequence. We can then access the two groups using Matcher.group(int group):

String input = "Hello World12345Garbage";
String regexp = "(\\D*)(\\d*)";

Pattern pattern = Pattern.compile(regexp);
Matcher matcher = pattern.matcher(input);
matcher.find();
System.out.println("Text  : " + matcher.group(1));
System.out.println("Number: " + matcher.group(2));

Output:

Text  : Hello World
Number: 12345 

Accessing the capture groups by index can be misleading and difficult to maintain, especially for more complex regular expressions. Starting with Java 7, the API also supports named capture groups. A capture group can be given a name by adding ?<name> directly after the opening paranthesis:

(?<text>\D*)(?<number>\d*)

Then, the capture groups can be accessed by their name instead of their index, using Matcher.group(String name):

String input = "Hello World12345Garbage";

String regexp = "(?<text>\\D*)(?<number>\\d*)";

Pattern pattern = Pattern.compile(regexp);
Matcher matcher = pattern.matcher(input);
matcher.find();
System.out.println("Text  : " + matcher.group("text"));
System.out.println("Number: " + matcher.group("number"));

Output:

Text  : Hello World
Number: 12345 

Changing the password of the embedded LDAP server

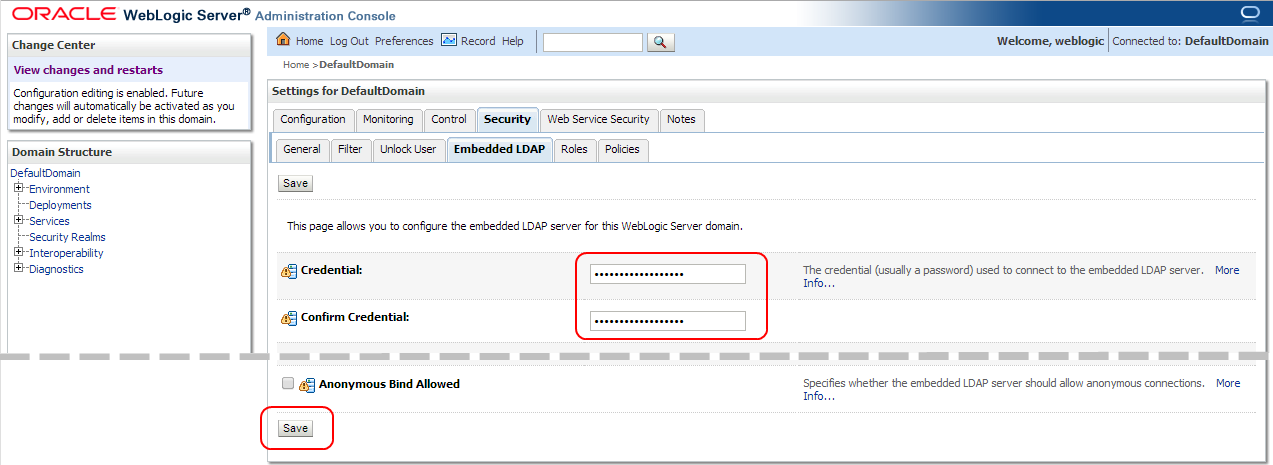
When the default domain for the internal weblogic server is created by JDeveloper, the password for the embedded LDAP server is automatically generated and can not be retrieved. So, in order to access the embedded LDAP server from an external client, this default password needs to be set to a well-known one: Open the weblogic administration console (like https://www.labcorner.de:7101/console), and navigate to the default domain:

Then, select the “Security” Tab:

From there, open the “Embedded LDAP” sub-tab:

Finally choose a new password and save it with the “save” button at the bottom of the page:

This does not have any impact on running and deploying the application, but will now allow access from external tools like JExplorer. Note that the WebLogic server needs to be restarted for the change to take effect.

Fixing class layout in MS Visio when using Stereotypes

There is one annoying thing in MS Visio when using Stereotypes in an UML class diagram: sometimes, the stereotype name is shown on the same line as the class name, where it should really be above the class name:

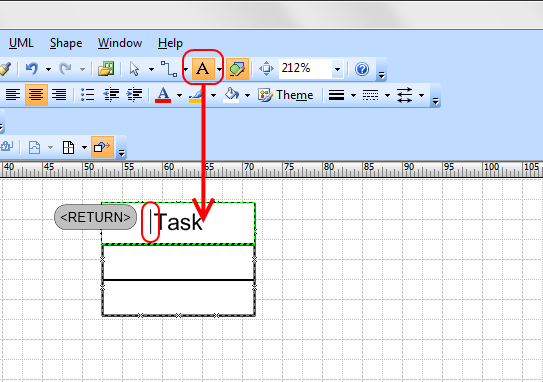
It is not really reproducable when this happens – sometimes adding attributes or operations fixes the layout, sometimes changing the class name breaks the layout. In any case, this article describes a solution how to fix it: 

  • Choose the text tool and select the class name in the class node.
  • Place the cursor before the class name and press RETURN.

This adds a line feed in front of the class name and makes the stereotype render properly above the class name: