Some background on optimistic locking in ADF

Configuring optimistic locking

ADFbc can be configured with different locking modes, in particular pessimistic and optimistic locking. Since pessimistic locking might create pending row-level locks on the database, the general recommendation is to use optimistic locking for web applications, to achieve a good performance. For more information, see Fusion Application Developers Guide, 40.11 Keeping Pending Changes in the Middle Tier. To configure optimistic locking, either set the jbo.locking.mode property of your application module configuration to “optimistic” or configure the locking mode globally in .adf/META-INF/adf-config.xml:

...
<amconfig-overrides>
  <config:Database jbo.locking.mode="optimistic"/>
</amconfig-overrides>
...

If configured, the setting from adf-config.xml takes precedence over the application module property.

Detecting lost updates

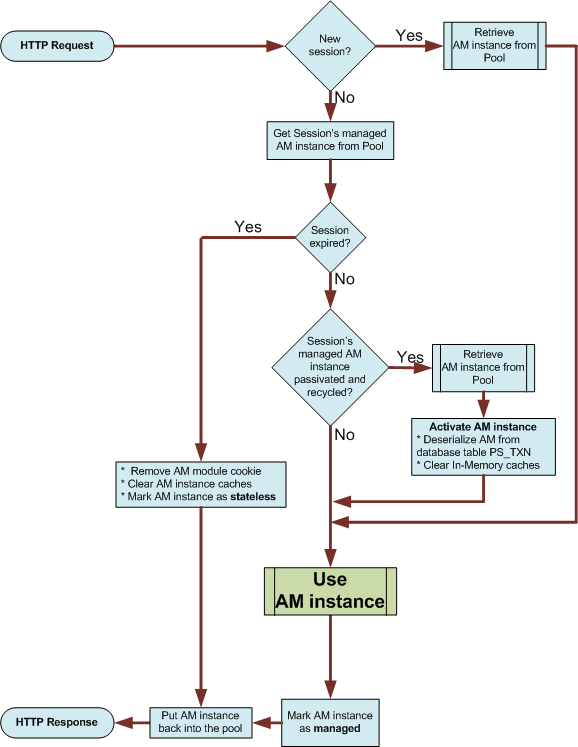
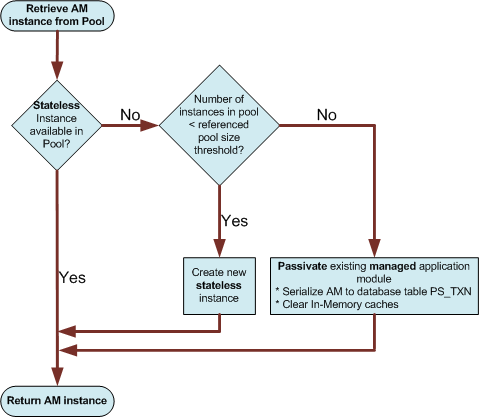
With optimistic locking, when more than one user is working on the same set of data, it can happen that the same attribute is modified by more than one user at the same time. When the first user commits his transaction, the updated value is written back to the database – other users would never see these (probably important) modifications, and when the next user also commits the transaction, his modifications would be written back to the database, overwriting the modifications from the first user. This phenomenon is also known as “lost update“. ADF has the ability to detect attempts to update data which has been modified in parallel. When the data is committed (e.g. by executing the “commit” action on the application module), ADF performs the following actions: 1. The row is locked on the database by executing an SELECT ... FOR UPDATE NOWAIT query, like

SELECT DATA, ID   
FROM SIMPLE SimpleEO   
WHERE ID=:1   
FOR UPDATE NOWAIT

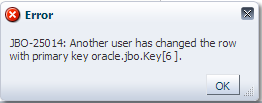
2. ADF then compares the values selected through this query against the current values stored in the entity object. If any of the attribute values have changed, ADF will display an error dialog:

Improving performance by using a change indicator

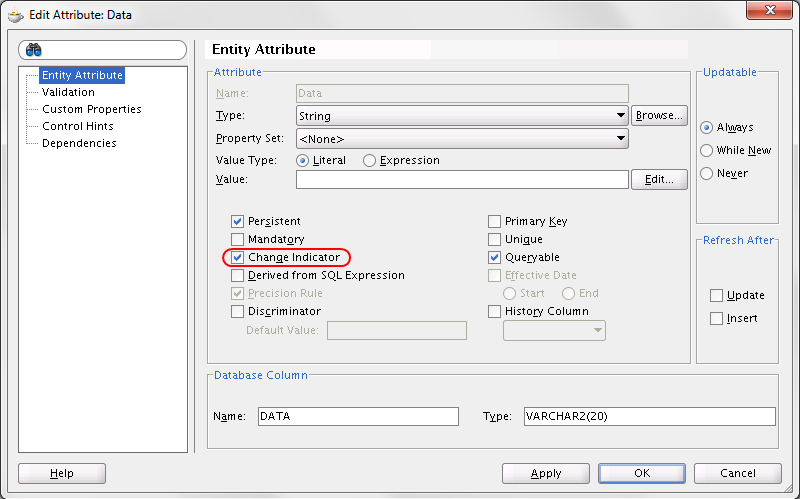
Comparing all attributes in the EO in step 2 above can be time consuming, especially if the EO contains many attributes. To improve the performance, it is possible to define one of the attributes as a change indicator:

NOTE:
In several books, it says “one or more attributes can be selected as change indicator” – however, at least with JDeveloper 11.1.1.7, only one attribute of an EO can be selected as change indicator. If setting the flag on one attribute, JDeveloper automatically resets the flag on the other attribute where it has previously been set. This is also consistent with the Javadoc, where it says
This method uses the ChangeIndicator attribute, if it is present, for the comparison. If ChangeIndicator is not present, then this method compares the data for overlapping columns between the entity and the given array.” When a change indicator is defined on the EO, the framework only performs the comparison for the attribute marked as such, instead of for every entity attribute. Note however that the SQL statement still queries all attributes! An important detail is that the change indicator attribute needs to be a system field which is automatically updated in the background whenever the row in the database is modified, for example through an ON UPDATE database trigger. Do not use an attribute which can be edited by the user – otherwise, ADF assumes that the record has been modified by another user even though that is not the case. This check is not done when committing the data, but already when changing the attribute value (means, when calling the setAttribute() method on the EO). This might result in the following error message on the ADF rich client UI (note the different representation as a popup window, not as a dialog like above):

See also this article from Chris Muir for more information on optimistic locking: The case of the phantom ADF developer (and other yarns)

Wrapping the constant interface anti pattern into an Enum

Especially in legacy code, we sometimes come across code like this, also known as the Constant Interface Antipattern:

public interface Constants {
   static int DML_DELETE = 0x02; 
   static int DML_INSERT = 0x05;
   static int DML_UPDATE = 0x10; 
}

Since Java 5, a much better alternative is to use an enum. If possible, code like the above which only defines constants should be converted into a corresponding enum. However, sometimes this is not possible, for example when using a library where the source code is not available. Then, we can still take advantage of enums in our own code by wrapping the legacy constants into an enum type. By default, a Java enum only allows to map from the the enum name to the enum itself, but in our scenario we also need to be able to map the legacy integer constants to the corresponding enum. The following code shows how the above interface could be wrapped into an enum:

public enum ConstEnum {
   DML_DELETE(Constants.DML_DELETE),
   DML_INSERT(Constants.DML_INSERT),
   DML_UPDATE(Constants.DML_UPDATE);
   
   private int constValue;

   // we need to create a reverse map for the enum in order to allow reverse lookups
   private static HashMap<Integer, ConstEnum> revMap = new HashMap<>();
   static {
      for (ConstEnum e : values()) {
         revMap.put(e.value(), e);
      }
   }

   // private constructor for the integer value
   private ConstEnum(int someValue) {
      constValue = someValue;
   }

   public int value() {
      return constValue;
   }

   public static ConstEnum enumFor(int value) {
      ConstEnum result = revMap.get(value);
      if (result == null) {
         throw new NoSuchElementException(ConstEnum.class.getName() + " for " + value); 
      }
      return result;
   }
}

The core of this code is the revMap hashmap which is initialized in the static initializer and puts all available enum objects and their corresponding integer values into a hashmap, so that we can look up the enum object by its integer value, which is done in the enumFor() method. The static values() method is provided automatically by the java compiler for all enum types. The following samples show how the enum type can now be used: List all available values:

for (ConstEnum val : ConstEnum.values()) {
   System.err.println(val + "=" + val.value());
}

DML_DELETE=2
DML_INSERT=5
DML_UPDATE=16

Convert legacy int value into enum:

int someValue = 5;
ConstEnum e = ConstEnum.enumFor(someValue);
System.err.println(e + "=" + e.value());

DML_INSERT=5

Switch on a legacy int value:

someValue = 2;
ConstEnum e = ConstEnum.enumFor(someValue);
switch(e) {
   case DML_DELETE : System.err.println("DELETE");  break;
   case DML_INSERT : System.err.println("INSERT");  break;
   case DML_UPDATE : System.err.println("UPDATE");  break;
}

DELETE

Remember: use createInsert with af:table!

I came across this issue (again) yesterday, so I think it is worth to quickly outline it here: Oracle ADF provides two operations on a data collection to create new records, that is create and createInsert. When searching through the documentation, it turns out that the differences are:

  • create
    Opens a slot for a new record in the collection, before the current record. The new record is not added to the collection immediately (as part of the create operation itself), but only after the page has been submitted. The advantage is that no empty, orphaned record is left behind when the user navigates away from the page, without submitting it.

  • createInsert
    This is the same as create, but the new record is added to the collection immediately, as part of the createInsert operation itself.
In other words, after the http request corresponding to the create operation has finished, the collection does not contain a new record – the “new” record is maintained by the ADF framework as a temporary object in the background, until the page is submitted. On the other hand, when using the createInsert operation, then the collection does contains the new record when the http request has returned. This makes a big difference when inserting a row into an af:table component: the af:table requires that the new record is available in the collection in order to render it, otherwise no new row will be visible. So, while create can still be used with forms, make sure that you always use createInsert when adding new rows to an af:table! There is a nice article by Andrejus Baranovski which describes this in more detail: ADF Create and CreateInsert Operations for ADF Table.